量化金融与金融编程
L08 shiny & *dashboard
曾永艺
厦门大学管理学院
2023-12-01
1. shiny v1.8.0
(Web Application Framework for R)
>> shiny
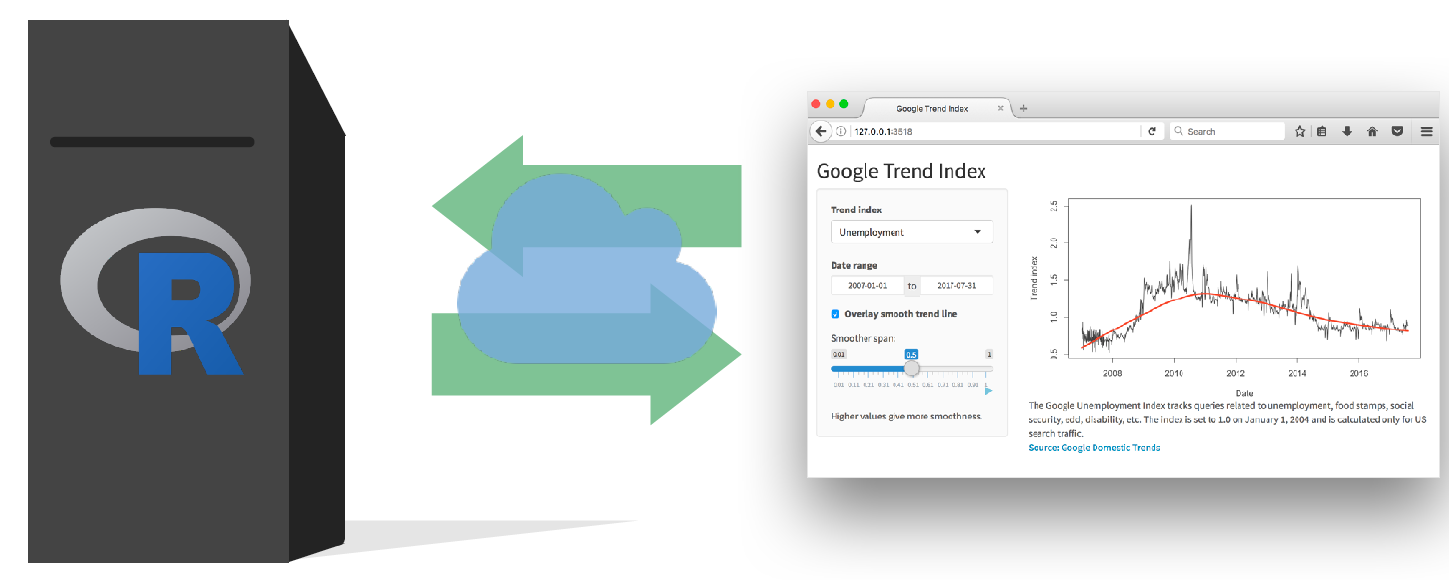
shinyapp 是指和一台正运行着 R 会话(live R session)的计算机(即服务端 Server)相连的网页(即用户界面 UI)。
>> shiny
shinyapp 是指和一台正运行着 R 会话(live R session)的计算机(即服务端 Server)相连的网页(即用户界面 UI)。

>> shiny
shinyapp 是指和一台正运行着 R 会话(live R session)的计算机(即服务端 Server)相连的网页(即用户界面 UI)。

>> shiny
shinyapp 是指和一台正运行着 R 会话(live R session)的计算机(即服务端 Server)相连的网页(即用户界面 UI)。


- 用户直接在 UI 中操作,而 Server 根据要求运行 R 代码并更新 UI 内容。
>> shiny Workflow
File | New File | Shiny Web App ... *
# app.R #library(shiny)# 1. Define UI for applicationui <- fluidPage( # Nested R functions that assemble # an HTML UI for your app)# 2. Define server logicserver <- function(input, output) { # Instructions on how to (re)build # the R objects displayed in the UI}# 3. Combines ui and server into an appshinyApp(ui = ui, server = server)>> shiny Workflow
File | New File | Shiny Web App ... *
# app.R #library(shiny)# 1. Define UI for applicationui <- fluidPage( # Nested R functions that assemble # an HTML UI for your app)# 2. Define server logicserver <- function(input, output) { # Instructions on how to (re)build # the R objects displayed in the UI}# 3. Combines ui and server into an appshinyApp(ui = ui, server = server)基于模板创建 app.R 文档
定义 app 的 UI:
- 定义 UI 的布局(layout)
- 通过
*Input()、*Botton()等函数增加用户输入界面 - 通过
*Output()函数增加输出界面
告诉服务端如何根据
server函数中 R 代码来计算并呈现输出:- 用
output$<id>连接输出 - 用
input$<id>连接输入 - 将代码嵌入
render*()函数中以得到拟输出的结果
- 用
用按键或命令
runApp(<path>)运行 app分享你的 app(如通过https://www.shinyapps.io/)
* 也可以用快捷方式输入snippet:shinyapp -> Shift+Tab
>> shiny Basics
UI >> example codes
# Define UI for application that draws a histogramui <- fluidPage( # Application title titlePanel("Old Faithful Geyser Data"), # Sidebar with a slider input for number of bins sidebarLayout( sidebarPanel( sliderInput( inputId = "bins", label = "Number of bins:", min = 1, max = 50, value = 30) ), # Show a plot of the generated distribution mainPanel( plotOutput(outputId = "distPlot") ) ))>> shiny Basics
UI >> layouts
- app 的 UI 本质上就是个 HTML 文档
fluidPage( titlePanel("Old Faithful Geyser"), textInput("a", ""))⇓
<div class="container-fluid"> <h2>Old Faithful Geyser</h2> <div class="form-group shiny-input-container"> <label class="control-label" id="a-label" for="a"></label> <input id="a" type="text" class="form-control" value=""/> </div></div>>> shiny Basics
UI >> layouts
- app 的 UI 本质上就是个 HTML 文档
fluidPage( titlePanel("Old Faithful Geyser"), textInput("a", ""))⇓
<div class="container-fluid"> <h2>Old Faithful Geyser</h2> <div class="form-group shiny-input-container"> <label class="control-label" id="a-label" for="a"></label> <input id="a" type="text" class="form-control" value=""/> </div></div>- Pages
fluidPage(); navbarPage(); fixedPage(); fillPage(); bootstrapPage(); basicPage() - Layouts
sidebarLayout(); flowLayout(); splitLayout(); verticalLayout(); fluidRow(); fillRow(); fixedRow() - Panels
titlePanel(); sidebarPanel(); mainPanel(); absolutePanel(); conditionalPanel(); fixedPanel(); headerPanel(); inputPanel(); navlistPanel(); tabPanel(); tabsetPanel(); wellPanel() - Inputs and Outputs ▼
>> shiny Basics
UI >> Inputs
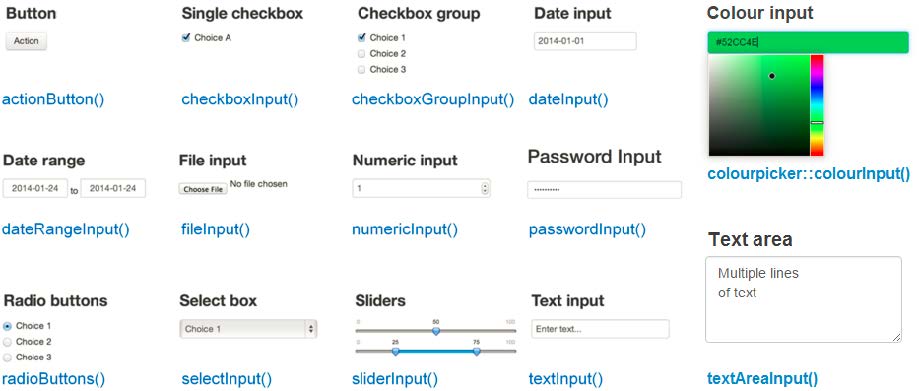
- 通过
inputfunc(inputId, label, ...)来收集用户的输入 - 通过
input$<inputId>获得响应式输入对象的当前取值
>> shiny Basics
UI >> Inputs
- 通过
inputfunc(inputId, label, ...)来收集用户的输入 - 通过
input$<inputId>获得响应式输入对象的当前取值
>> shiny Basics
UI >> Outputs
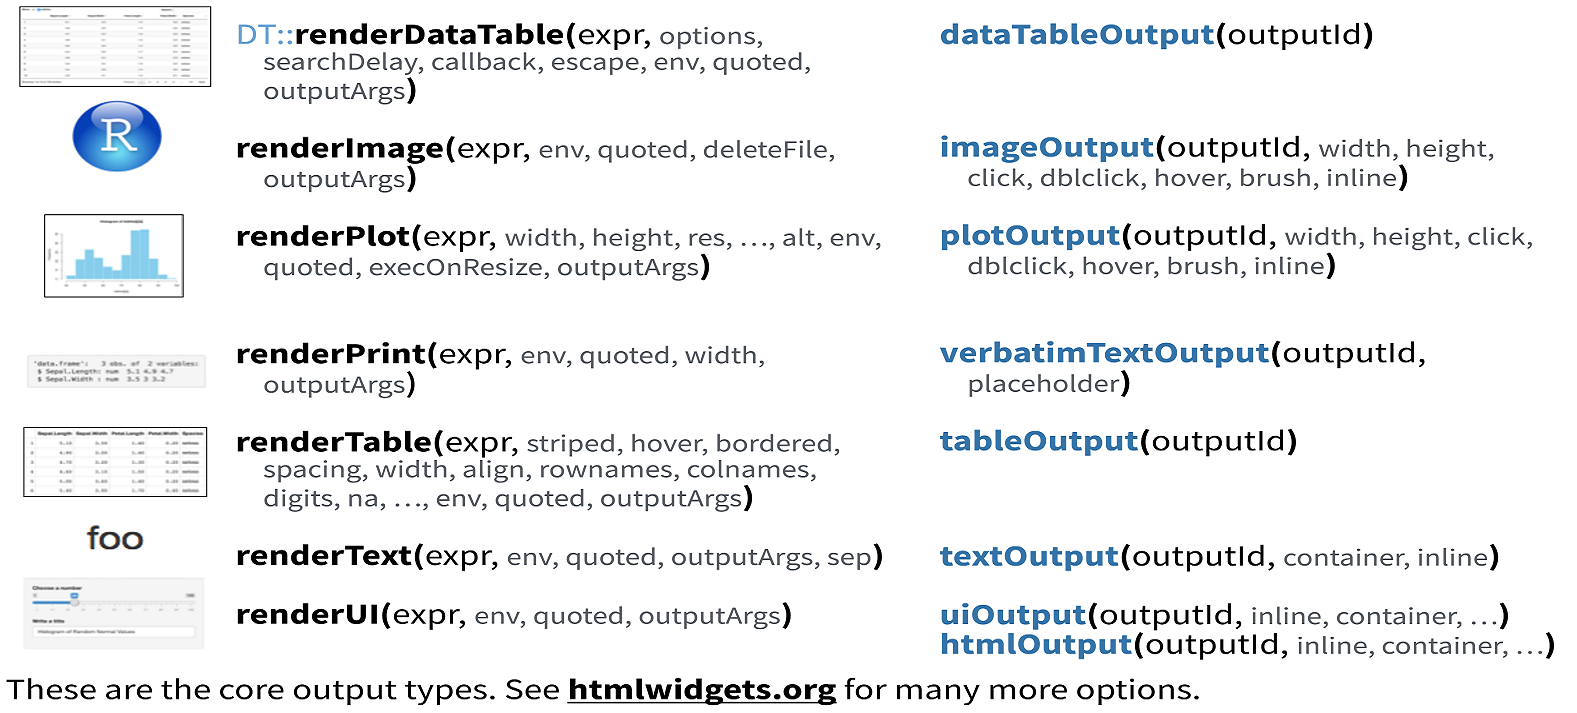
- 前端
*Output()和 后台render*()👫 工作来给 UI 增加输出
>> shiny Basics
UI >> Outputs
- 前端
*Output()和 后台render*()👫 工作来给 UI 增加输出
>> shiny Basics
server >> example codes
# Define server logic required to draw a histogramserver <- function(input, output, session) { output$distPlot <- renderPlot({ # generate bins based on input$bins from ui x <- faithful[, 2] bins <- seq(min(x), max(x), length.out = input$bins + 1) # draw the histogram with the specified number of bins hist(x, breaks = bins, col = 'darkgray', border = 'white') })}>> shiny Basics
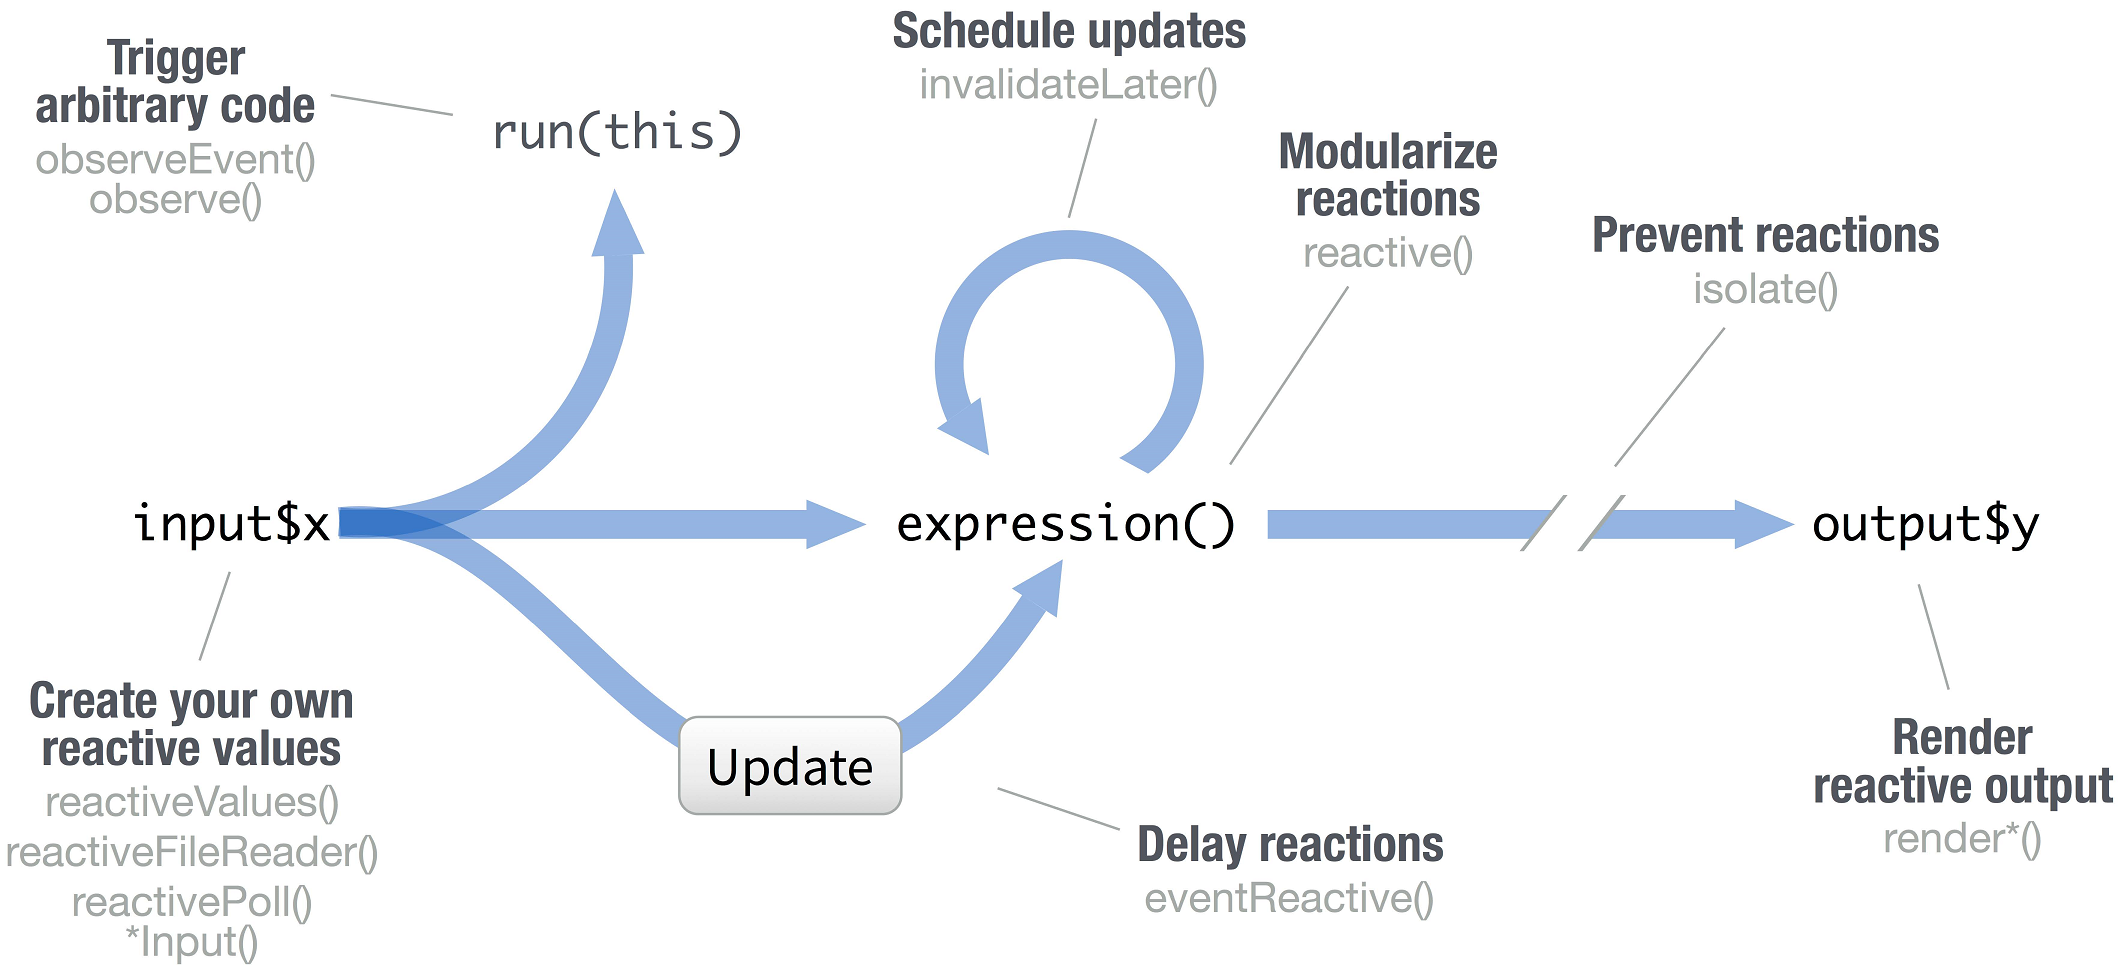
reactivity
>> shiny Basics
shiny::runExample("01_hello")
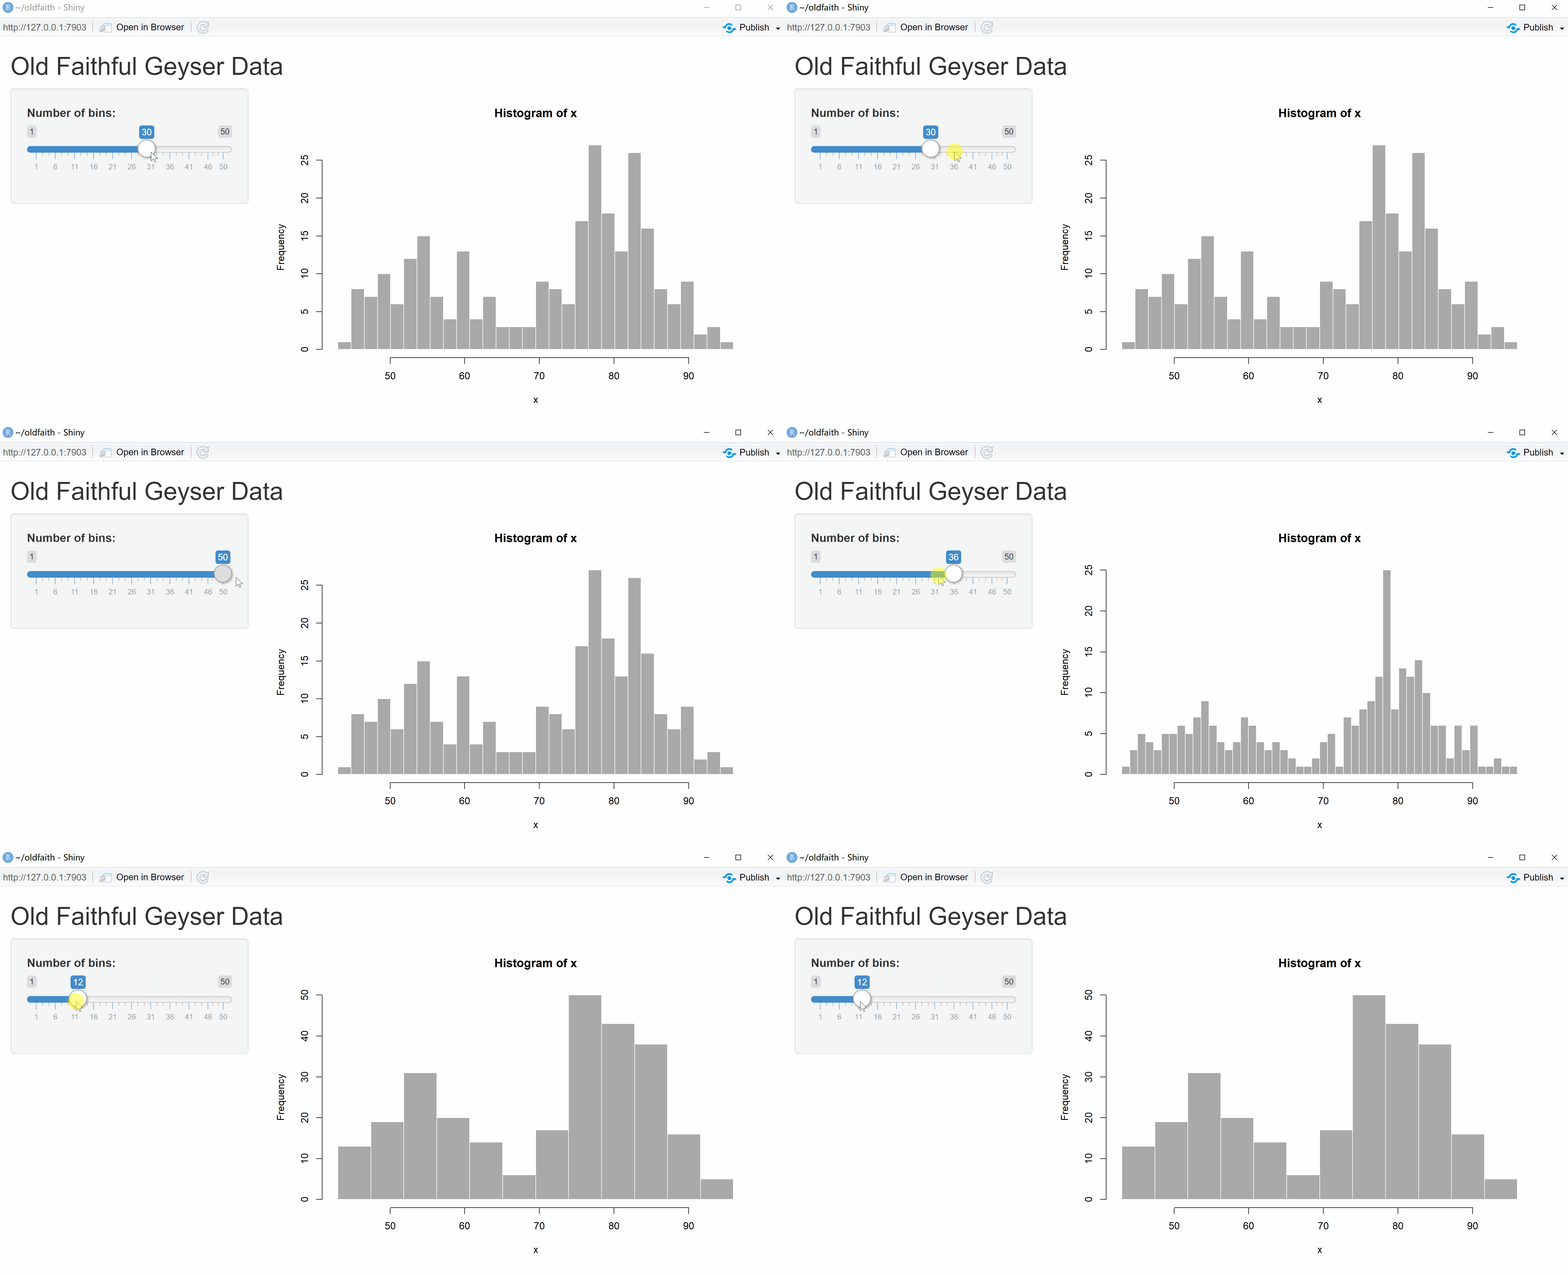
* shiny::runExample() 列出内置的11个App示例,可尝试运行并查看代码。
2. shinydashboard v0.7.2
bs4Dash v2.3.0
(Create Dashboards with Shiny)
>> shinydashboard Structure
shinydashboard 利用 {{AdminLTE}} * 提供的模板主题工具,这让使用 shiny 开发仪表盘式的网页 App 变得更加容易。
* Best open source admin dashboard & control panel theme. Built on top of Bootstrap, AdminLTE provides a range of responsive, reusable, and commonly used components.
>> shinydashboard Structure
shinydashboard 利用 {{AdminLTE}} * 提供的模板主题工具,这让使用 shiny 开发仪表盘式的网页 App 变得更加容易。
* Best open source admin dashboard & control panel theme. Built on top of Bootstrap, AdminLTE provides a range of responsive, reusable, and commonly used components.
## app.R ##library(shiny)library(shinydashboard)ui <- dashboardPage( # 仪表盘页面由三部分组成: dashboardHeader(), # 表头 dashboardSidebar(), # 边栏 dashboardBody() # 主栏)server <- function(input, output) { }shinyApp(ui, server)
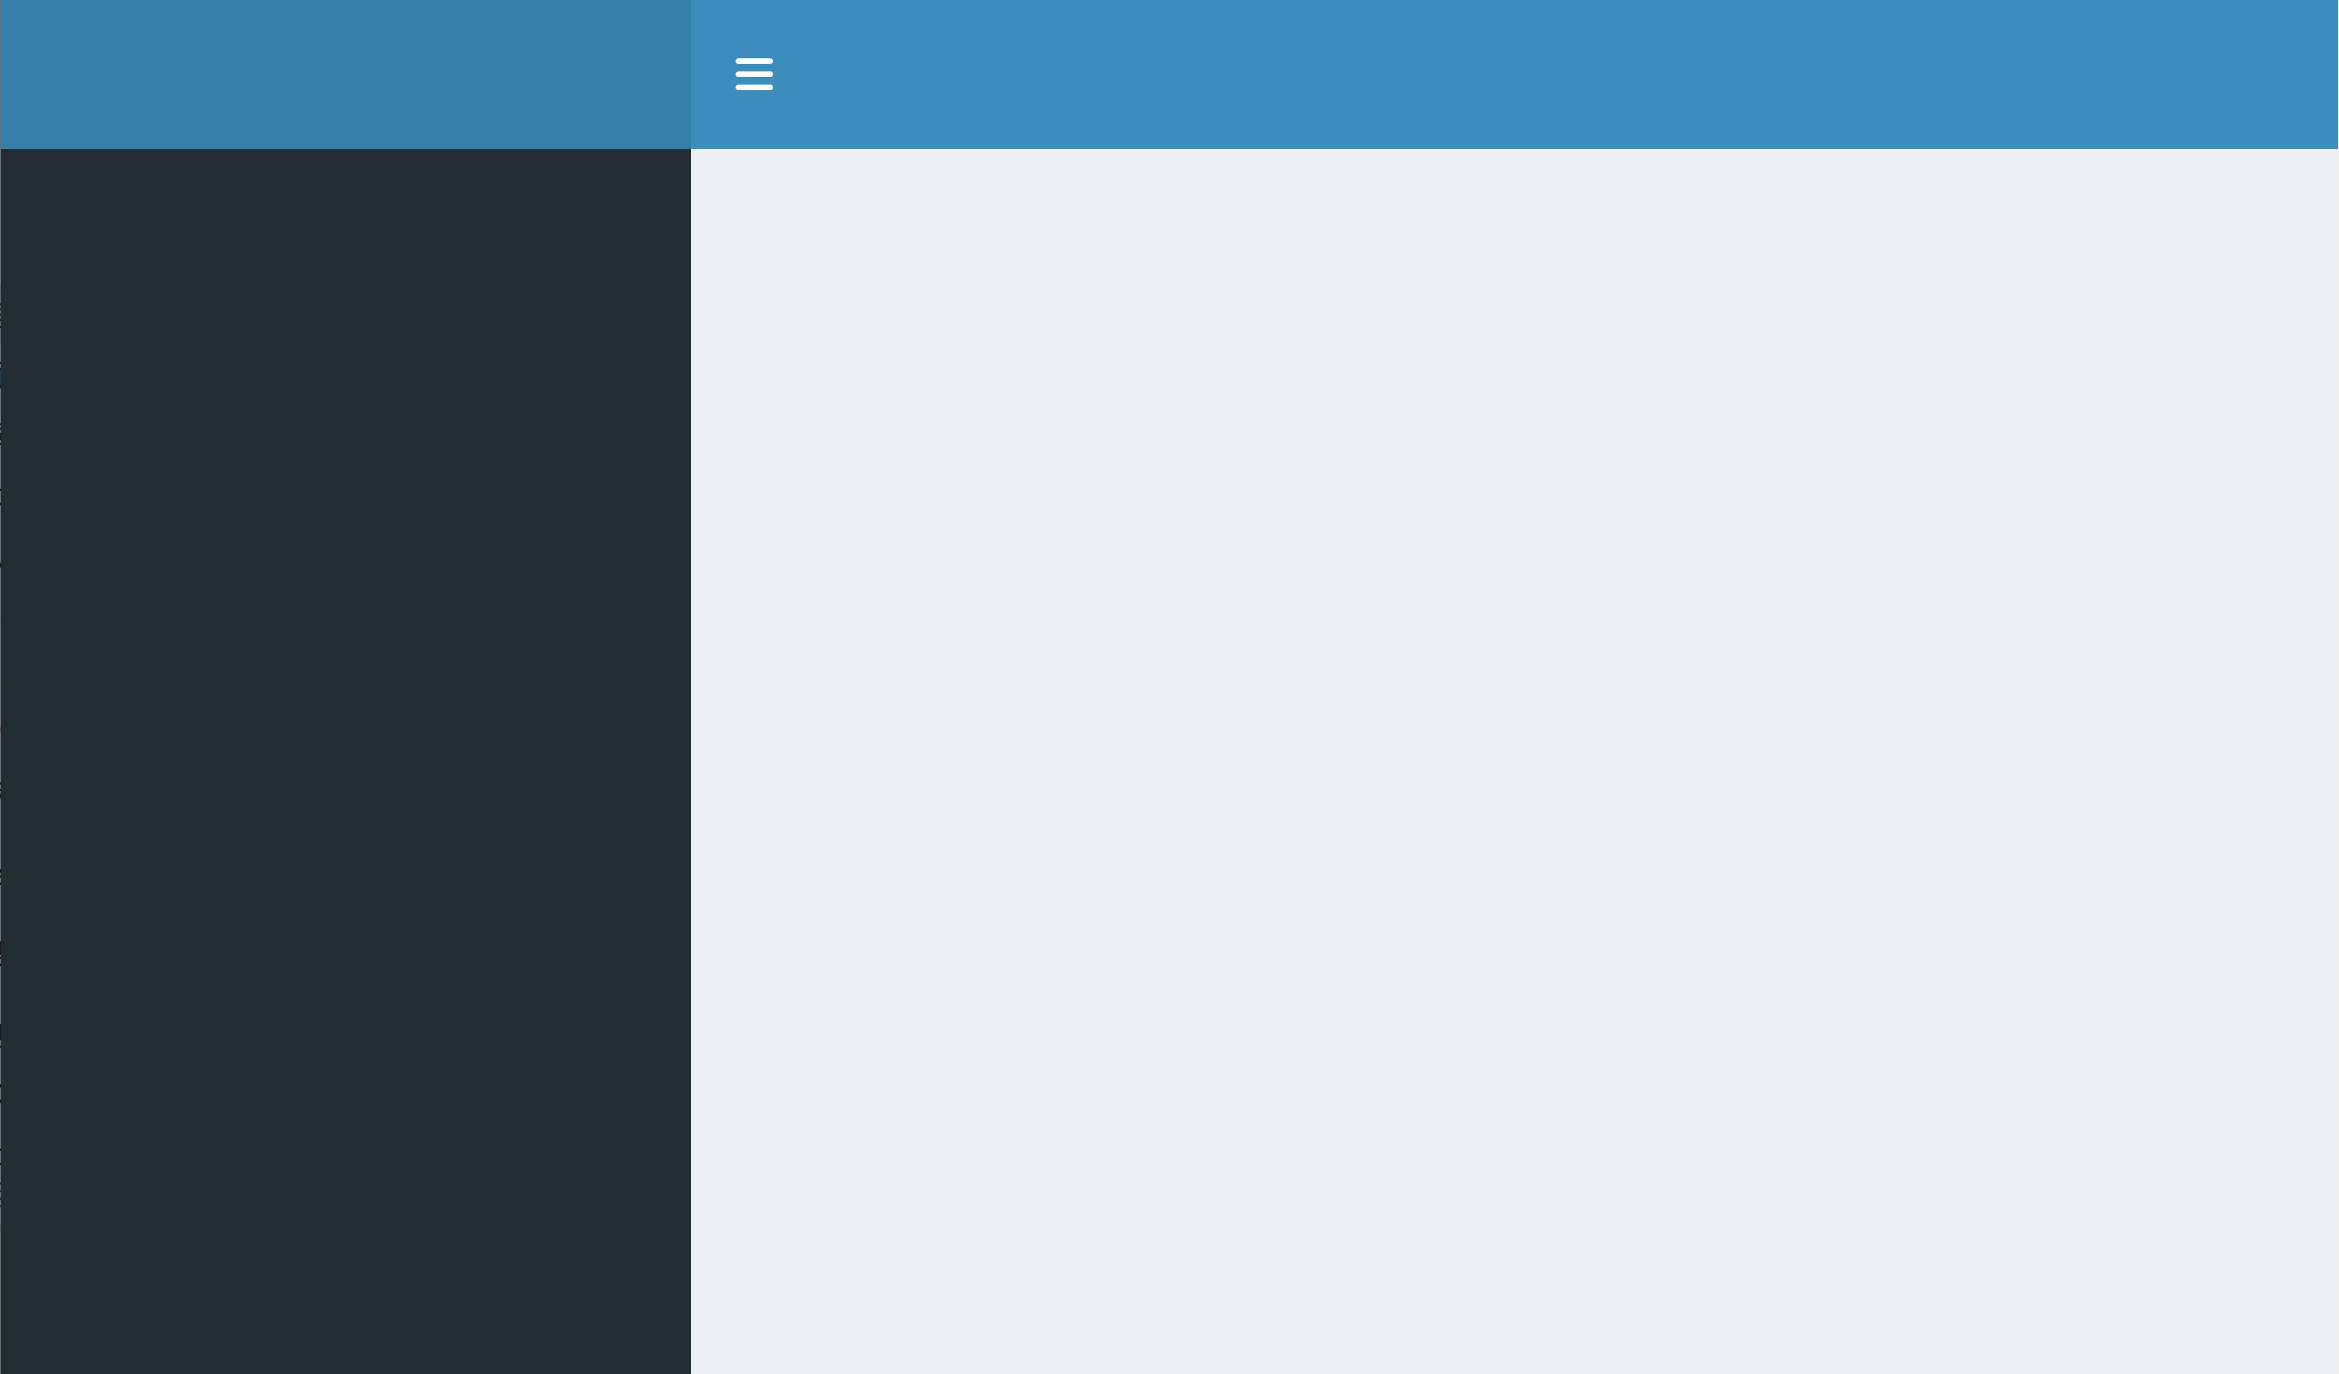
>> shinydashboard Structure >> dashboardHeader()

ui <- dashboardPage( dashboardHeader( # 表头 title = "My awesome DashBoard", dropdownMenu( # 可重复多个 dropdownMenu() type = "messages", # "notifications" / "tasks" badgeStatus = "primary", icon = NULL, messageItem( # 可重复多个 messageItem() from, message, icon, time, href ), # ... ), # dropdownMenuOutput() # dynamic dropdown menu (UI-side) ), dashboardSidebar(), # 边栏 dashboardBody() # 主栏)>> shinydashboard Structure >> dashboardSidebar()
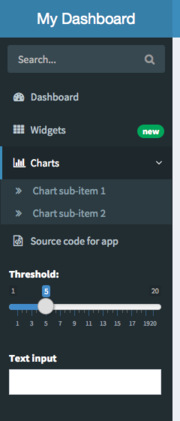
SIDEBAR <- dashboardSidebar( sidebarMenu( menuItem("Dashboard", tabName = "dashboard", icon = icon("dashboard")), menuItem("Widgets", icon = icon("th"), tabName = "widgets", badgeLabel = "new", badgeColor = "green") # menuItemOutput() # dynamic sidebar menu item (UI-side) ), # sidebarMenuOutput(), # dynamic sidebar menu (UI-side) # sidebarSearchForm(), sidebarUserPanel() sliderInput(inputId = "threshold", label = "Threshold", min = 1, max = 20, value = 5), # *Input())BODY <- dashboardBody( tabItems( tabItem(tabName = "dashboard", h2("Dashboard tab content")), tabItem(tabName = "widgets", h2("Widgets tab content")) ))dashboardPage(dashboardHeader(), SIDEBAR, BODY)>> shinydashboard Structure >> dashboardBody()
BODY <- dashboardBody( # mixed row and column layout fluidRow( box(title = "Box title", width = 6, status = "primary", "Box content"), box(status = "warning", width = 6, "Box content") ), fluidRow( column(width = 4, box( title = "Title 1", width = NULL, solidHeader = TRUE, status = "primary", "..." ), box( with = NULL, background = "black", "A box with a solid black background" ) ), # column(width = 4, box(...), box(...)), # column(width = 4, box(...), box(...)) ))# box() / tabBox(tabpanel()) / infoBox()/infoBoxOutput() / valueBox()/valueBoxOutput()
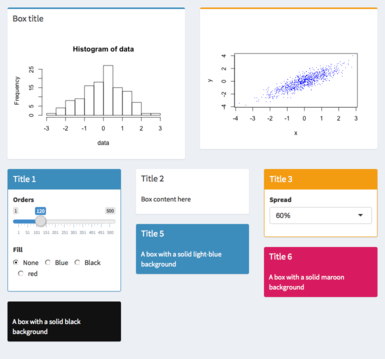
>> shinydashboard {{示例:Streaming CRAN data}}
>> bs4Dash {{示例}}
3. flexdashboard v0.6.2
(R Markdown Format for Flexible Dashboards)
>> flexdashboard
使用 R Markdown 将一组相关的数据可视化作为仪表盘图表展示
支持多种多样的内容组件(components),包括 htmlwidgets、基础图、lattice 图和 grid 图、表格数据、仪表(gauge)和数值框(value boxes)以及文本注释等等
灵活且容易设定的基于列或行的布局(layouts),内容组件会智能调整大小,填充浏览器空间并适合移动终端的显示。
可选择 Storyboard 布局(连环画布局)来展示系列可视化图表和相应的文字说明
可选择使用 {{Shiny}} 作为动态可视化的驱动引擎
可选择使用 {{
bslib包}},更容易个性化定制颜色、字体等
>> flexdashboard Template
File | New File | R Markdown ... | From Template | Flex Dashboard ...
>> flexdashboard Template
File | New File | R Markdown ... | From Template | Flex Dashboard ...
head codes
---title: "Untitled"output: flexdashboard::flex_dashboard: orientation: columns vertical_layout: fill--->> flexdashboard Template
File | New File | R Markdown ... | From Template | Flex Dashboard ...
head codes
---title: "Untitled"output: flexdashboard::flex_dashboard: orientation: columns vertical_layout: fill---```{r setup, include=FALSE}library(flexdashboard)```>> flexdashboard Template
layout codes
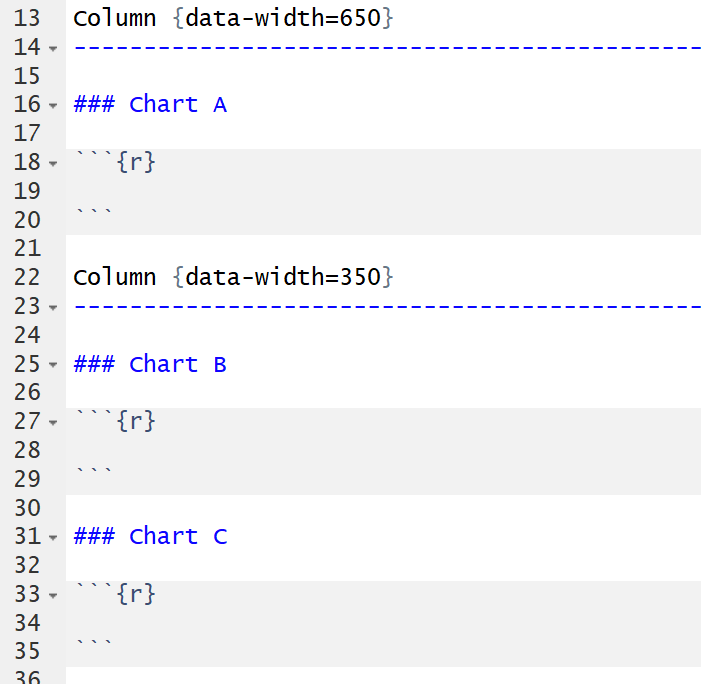
>> flexdashboard Template
layout codes

Knit it (Ctrl+Shift+K) and get ...
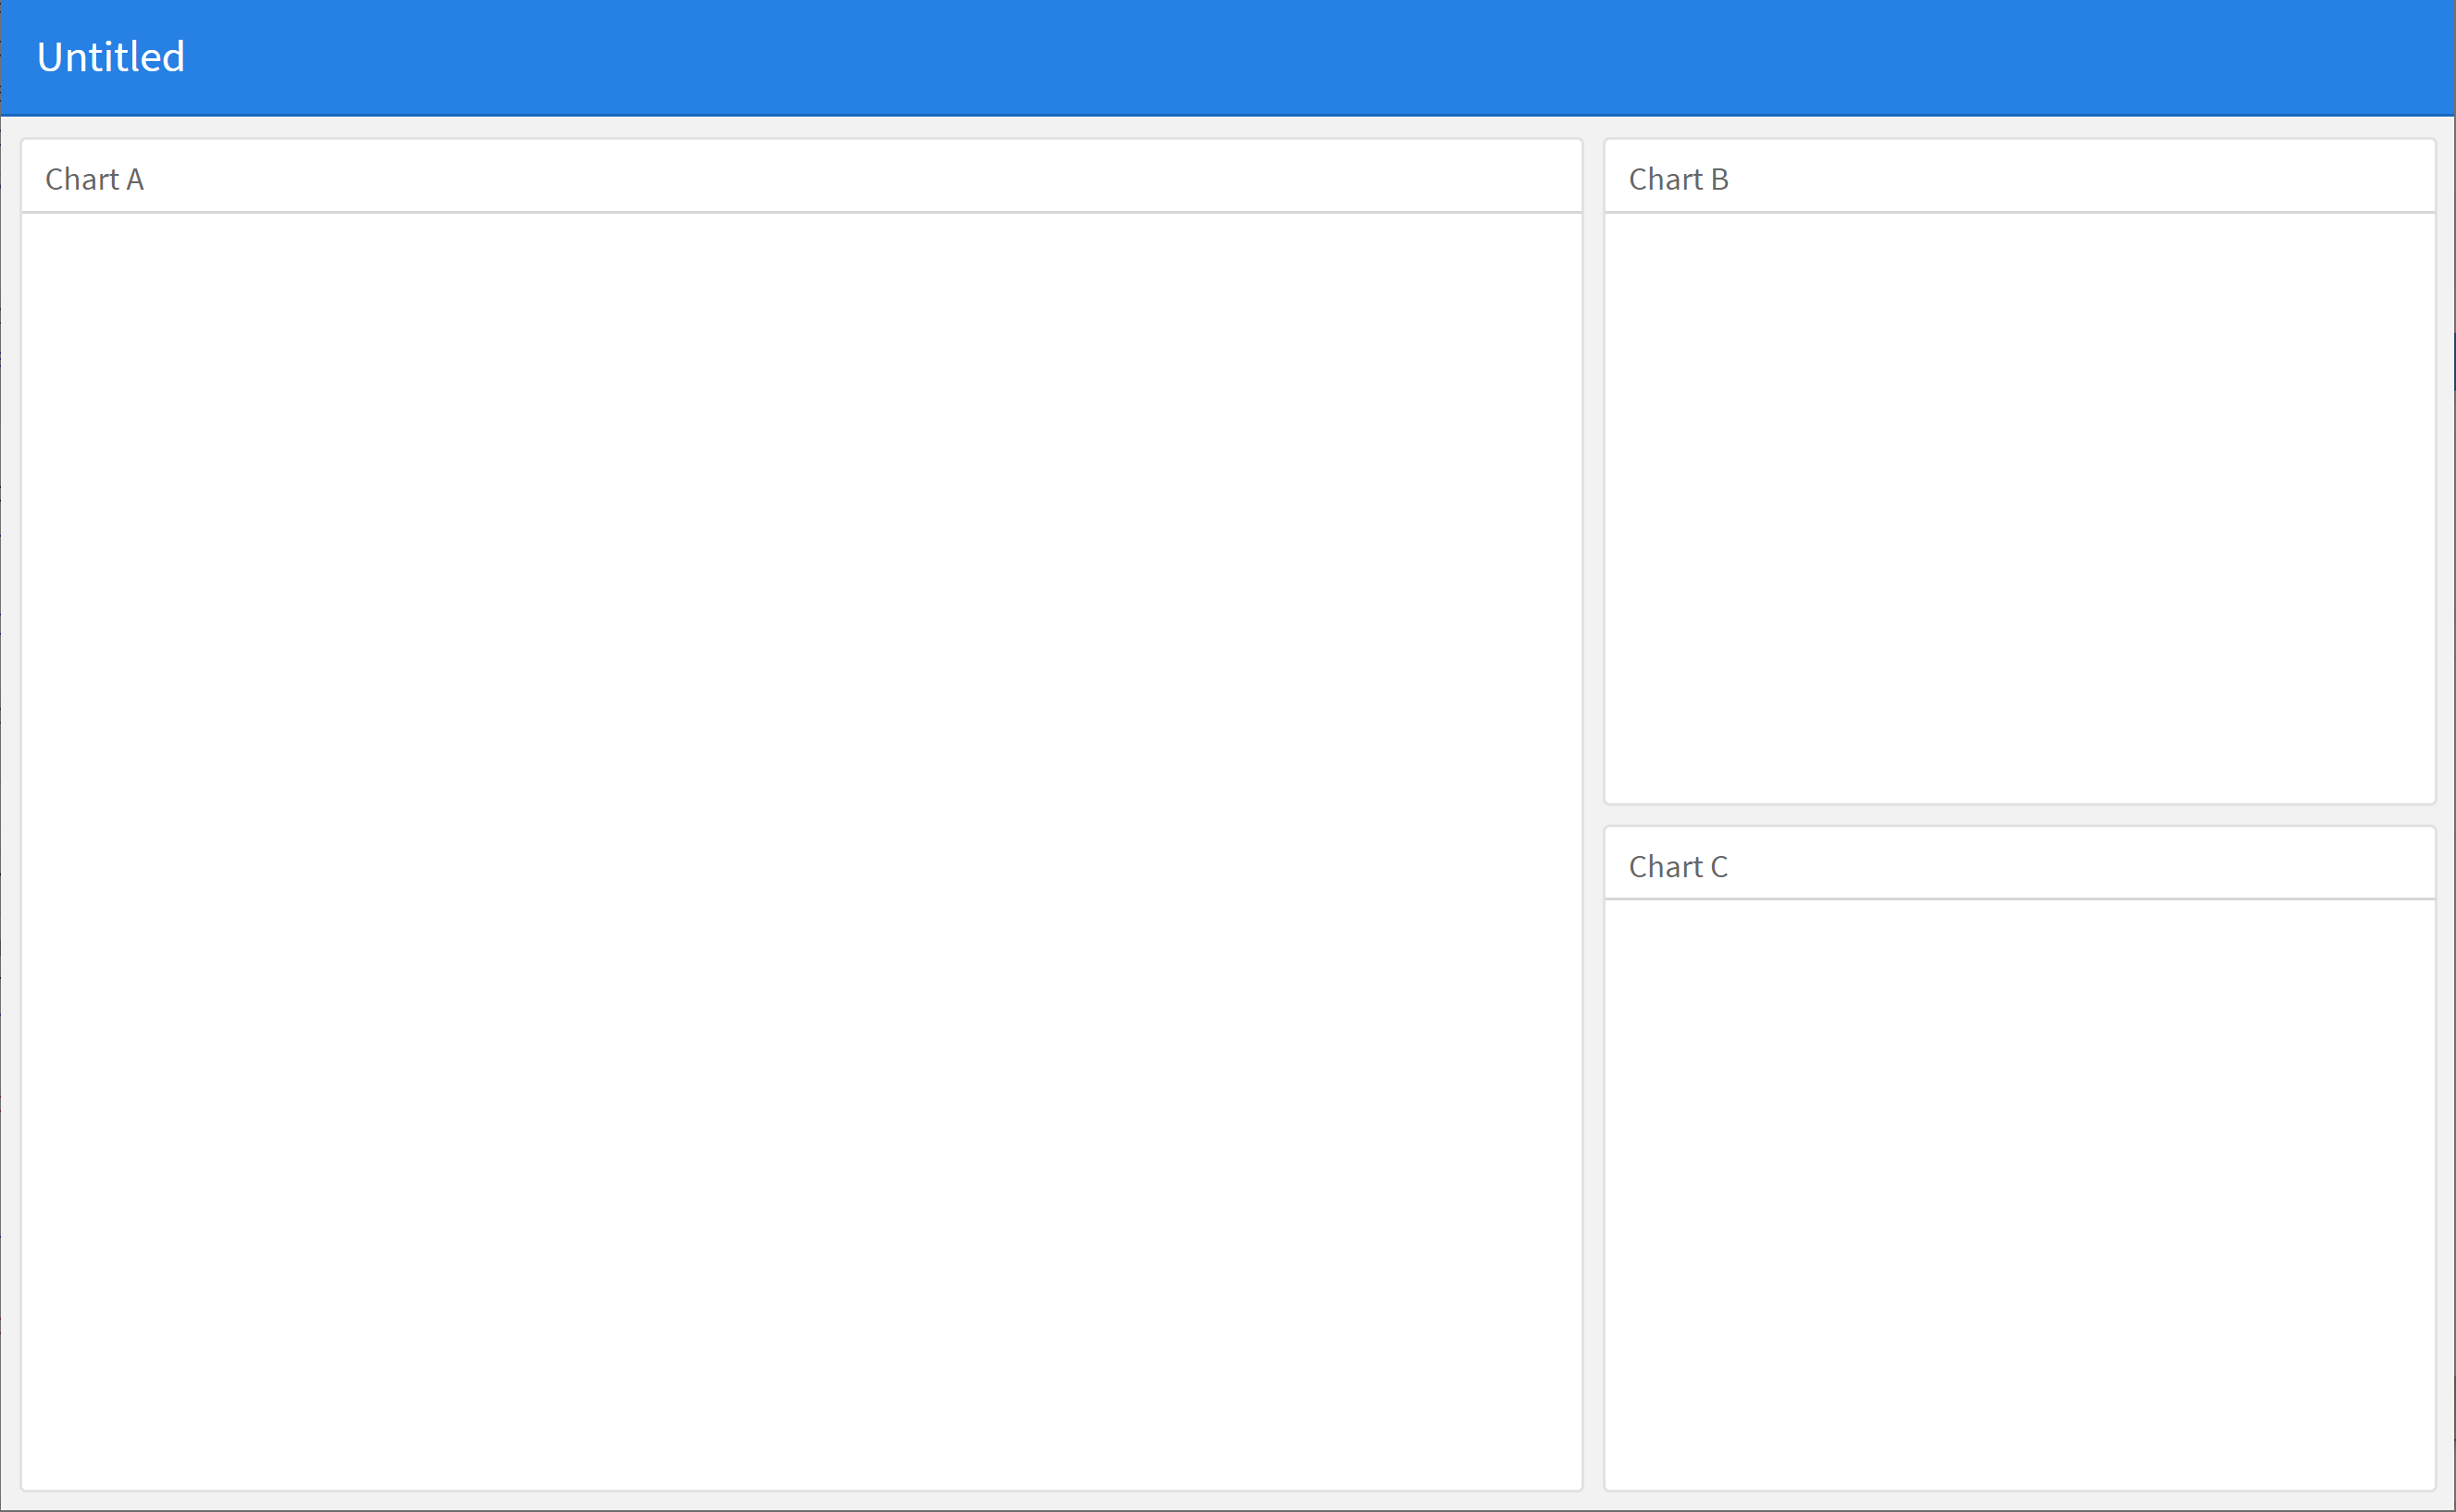
>> flexdashboard Layouts
Layouts >> markdown headers
# level 1: pages## level 2: columns / rows### level 3: boxeslevel 1: pages===level 2: columns / rows---### level 3: boxes
Layouts >> options
vertical_layout: fill | scrollorientation: columns | rowsstoryboard: false | true
>> flexdashboard Layouts
Layouts >> markdown headers
# level 1: pages## level 2: columns / rows### level 3: boxeslevel 1: pages===level 2: columns / rows---### level 3: boxes
Layouts >> options
vertical_layout: fill | scrollorientation: columns | rowsstoryboard: false | true
Layouts >> attributes
{data-orientation=columns|rows};{data-navmenu="Menu A"};{data-icon="fa-github"};{.hidden};{.storyboard}{data-height=#};{data-width=#};{data-padding=8};{.no-padding};{.no-title};{.sidebar}{data-commentary-width=300}{.mobile};{.no-mobile}
>>{{Sample Layouts,总有一款适合你!}}<<
>> flexdashboard {{Components}}
{{
htmlwidgets}}
提供对多个 JavaScript 数据可视化库的 R 语言绑定,如leaflet、dygraphs、plotly、rbokeh、highcharter、visNetwork等R 基础图、lattice 图、grid 图等
表格数据
- 静态的 dashboard 用
knitr::kable() - 基于
shiny的 dashboard 用shiny::renderTable() DT表格:静态的 dashboard 用DT::datatable(),基于shiny的 dashboard 则用DT::renderDataTable()
- 静态的 dashboard 用
- 仪表与数值框
# 仪表 示例gauge( rating, min = 0, max = 50, gaugeSectors( success = c(41, 50), warning = c(21, 40), danger = c(0, 20) ))# 数值框 示例valueBox( spam, icon="fa-trash", href="#details" color = ifelse( spam > 10, "warning", "primary"))文本说明
导航栏
>> flexdashboard {{示例:sharpe_ratio_flexdashboard}}
学习参考资源
相信同学们现在对 shiny、shinydashboard / bs4Dash 和 flexdashboard 有了初步的认识,以下列出相关的学习参考资料,同学们可进一步学习精进下 🏆
{{
shiny官网}} 上有大量的学习资料!👍👍👍:循序渐进的 {{7 份教程}}
Welcome to Shiny
Build a user interface
Add control widgets
Display reactive output
Use R scripts and data
Use reactive expressions
Share your apps
👍👍👍:{{示例库}}
bslib v0.6.0: Custom 'Bootstrap' 'Sass' Themes for shiny and rmarkdown
thematic v0.1.4: Unified and Automatic 'Theming' of ggplot2, lattice, and base R Graphics